I like concealing what and where I browse from eavesdroppers and web trackers respectively. To that end, I’ve been using OpenVPN and I have 2 minor issues with it:
Firstly, an eavesdropper can see that the VPN connection is obviously not regular, ubiquitous HTTPS traffic, even when my server runs on port 443/tcp.
Secondly, the outdated stable kernel of my OpenVZ VPS can’t do IPv6 NAT and so can’t give IPv6 connectivity to my VPN clients.
These considerations had me wondering, if I would be better served by an encrypted proxy, ideally one that would both accept proxy requests as well as serve websites on the same port. At first I tried Nginx with a module that lets it process CONNECT requests, which seemed promising, but turned out to be incompatible with authentication. Then I tried Squid. Then a Combination of Nginx, Squid and stunnel. None of the setups worked quite to my liking and I was starting to get frustrated, but then I remembered my neglected old friend Apache.
Apache does everything I want out of a proxy with no recompilation necessary.
Setting up Apache
Just install and enable the requisite mods.
apt-get install apache2 apache2-utils
a2enmod ssl proxy proxy_connect proxy_http auth_digest
Create a file to authenticate users against.
htdigest -c /etc/apache2/users.digest a2realm a2userAdd a virtual host config. Or expand an existing one. Proxying doesn’t interfere with serving a website on the same virtual host. Clients will only be asked to authenticate, when issuing proxy requests.
<VirtualHost *:443>
ProxyRequests On
AllowCONNECT 80 443
<Proxy *>
	AuthType Digest
        AuthName "a2realm"
        AuthDigestProvider file
        AuthUserFile "/etc/apache2/users.digest"
        Require valid-user
</Proxy>
SSLEngine on
SSLCertificateFile      /etc/letsencrypt/live/example.com/fullchain.pem
SSLCertificateKeyFile   /etc/letsencrypt/live/example.com/privkey.pem
</VirtualHost>
Finally, don’t forget to restart Apache for the config changes to take effect.
Configuring clients
Accessing proxies securely appears to be an uncommon practice. Firefox has an ‘SSL proxy’ configuration entry and the Linux Mint network settings editor has an ‘HTTPS proxy’ entry in its GUI. But all they let you do is specify hosts to which you’ll be sending your CONNECT requests in plaintext. Prepending “https://” host names in those fields causes the browser to try to resolve the whole string as a host name and, predictably, fail. But while it’s not simple, it’s not impossible either, it just takes jumping through one more hoop.
Namely, creating a proxy auto-config file. For whatever reason, Firefox and Linux Mint won’t let me set up a secure proxy with their GUIs, but will with this programmatic method. A proxy auto-config ( or ‘PAC’) file is a file containing a javascript function definition that takes the request URL and host name as arguments and returns the method and host to use as proxies. It can be as simple as
function FindProxyForURL(u,h){return "HTTPS example.com:443";}Saving this somewhere on your computer and then entering its URL as file:///wherever/you/saved/it.pac in your proxy settings, will let you access your proxy through HTTPS.
Pictures, conclusions, disclaimers
Here’s what OpenVPN running on port 443/tcp looks like to an eavesdropper. 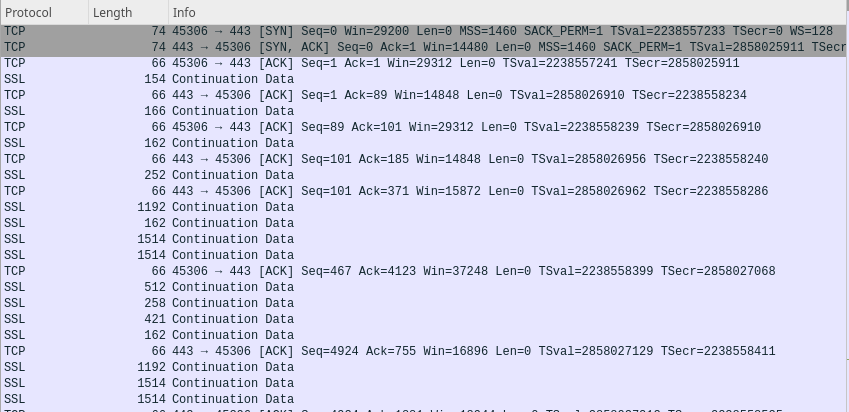
Here’s me curling the index of a Wordpress site through my proxy. 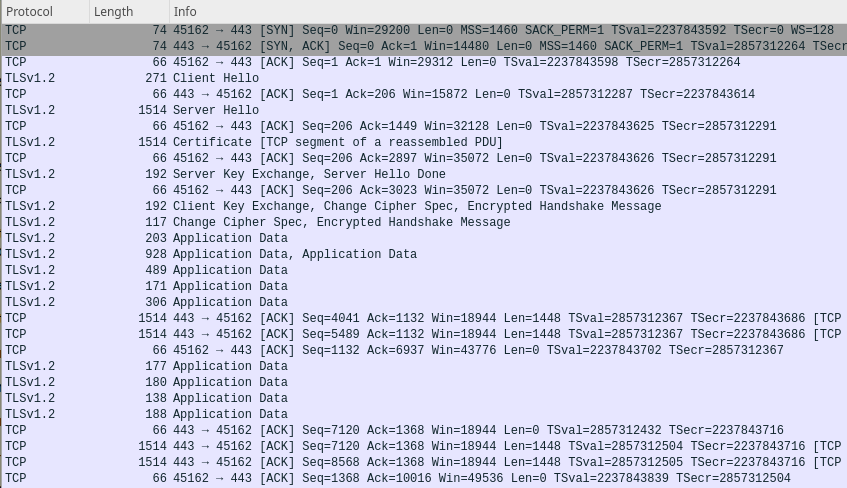
And here’s me doing the same without a proxy 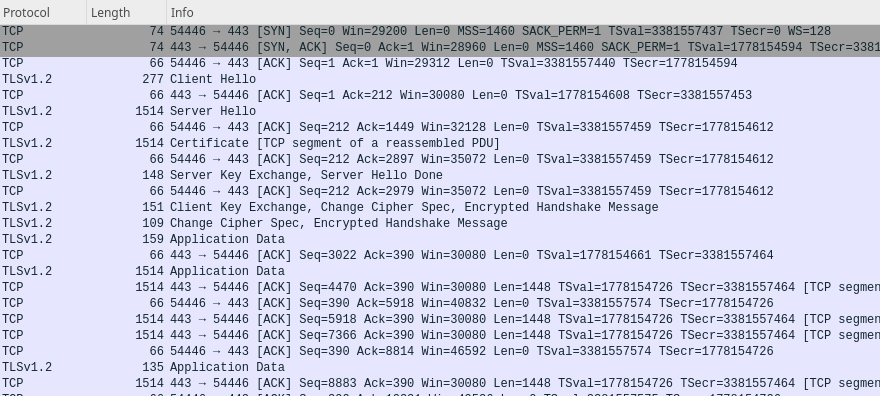
Sure, the last 2 captures don’t look identical. Someone paying attention to patterns in the traffic would still be able to detect proxy use, but it’s not as obviously dissimilar as OpenVPN and it gives me my IPv6 connectivity without NAT on the server.
And this concludes our presentation. If you have a question, a correction or a bit of useful knowledge on the subject you’d like to share, please mail it to ‘comments’ at this domain.